Wednesday, August 3, 2011

Prop Your Feet Up

Sorry I have been absent so long. I promise even though you haven’t heard from me doesn’t mean I am not doing projects.

Sometime this spring, I curbed this lovely ottoman. I don’t usually curb upholstered things but I knew I could easily strip this one down to wood and springs so I picked it up along with several other odds and ends._MG_5756
Lovely bird isn't it? Every time I saw it, I heard “BBRRAWWWWKKK!”_MG_5761

I started peeling back the nasty, dusty layers and lots of staples.
_MG_5763

_MG_5764

Which brought me here:_MG_5767

I bought 2 burlap coffee bags for $30 through Restore Interiors’ “Restore Alabama” silent action to help those hit by the tornados this spring. I got my bags from a cute little gal who blogs at reFreshreStyle. She covered a great chair with another sack. Check it out here!
I cut up an old duvet to use as the new padding. I put down probably 7 or 8 layers but which turned out firm but soft and free :) I didn’t take pictures through the recovering steps. It was so simple it would have bored you.

Ottoman 1-1

_MG_5882-1

 One thing of note, I cut the edges around the legs to the right length and then just hot glued them down. To give it a more polished look, I added upholstery nails to around the tops of the legs.
_MG_5879 
Cost breakdown:
Ottoman base: free!
Batting/Padding: free!
Burlap Coffee bag: $15 (I only used 1)
Upholstery nails: $3
Total: $18!

I hope to re-home it through a consignment shop here in Dallas and make a little craft supply money. But mostly our house was overflowing with furniture so it will be good to have this tripping hazard gone.

My ottoman is party with these great blogs:


The Shabby NestLadybird Ln

Friday, May 27, 2011

Pin-up #2

I just wanted to share a few pins with you that are on the top of my to do list.
This shower curtain is made with 5 dollar store shower curtains liners. Right now both of our bathrooms have just a single liner because I have a thing about shower curtains and the light they block. But they are definitely lacking style so this ruffled adaptation would be a perfect, prettier look. And cheap!

I’ve been saving wine corks for a while now with nothing in particular in mind. I also acquired a large piece of foam board that was used to pad a recent Craigslist transaction. That means I could make this for free! Yippee! Except I think I don't have nearly that many corks :(…but it is free :)


My biggest post-wedding project has been helping my mother-in-law with her bedroom (which is slightly complicated by the fact she lives 4 hours away in Houston.) This is the quilt she bought for her new king sized bed.
image
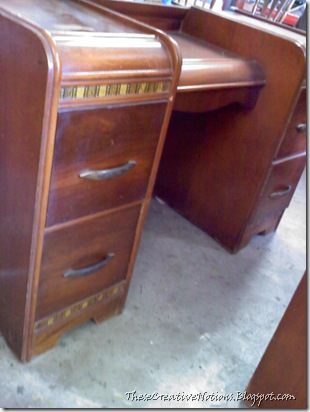
She has new nightstands that we got her off Craigslist for $50 for the pair but I don’t have a picture. We also got her a vanity, mirror, and chest of drawers for $115. They are art deco waterfall style with their original hardware and I love, love, love them. As rude as it might be to say, DIBS!imageimage (2)
They need a little work. I have researched how to shellac and should be able to return them to really good condition. I cleaned the dresser with mineral spirits and was surprised how much better it looked even after just that. Oh, and apparently once you shellac you don’t go back (teehee) Has anyone used shellac before? Any tips? One more picture to drool over. See that gouge on the 3rd drawer? I am fairly confident you wont even see it when I get done.
image (1)  
These aren’t pins so why am I showing you them? Because I have a board devoted to her room and because really this project is the top of my list. I hope to make my lovely MIL a large upholstered headboard for her bed. Something along these lines:

I really like the shape of this one. Simple but not quite a plain rectangle. I trying to decide between button tufts (which I think would be too busy with the quilt) or nail head trim (which I think would be too flashy and western with the quilt) or nothing (which I think will be too boring). Any other ideas? I am planning on using drop cloths for it and probably some curtains too. I like the trim and folded over edge of these.

She wanted the wall behind the bed painted a warm color but again with the quilt, I am scared to make things too busy and orange-y. May be pull out one of the blues or greens of her quilt? It’s not exactly warm tones but her quilt and all of the furniture pieces are.
One more pin for you, I think this antique specimen art would be a nice touch. I think the Graphics Fairy has several and I’d like to frame a few and hang them on either side of the vanity mirror.

Alright, that is my plan. Now I just need a little bit of actually making it happen!

Thursday, May 19, 2011

Post Wedding Pictures

I am sorry for the long absence. I have been so busy with the wedding I was doing for a friend that I didn’t have time to post as I went or even take pictures most of the time. Now that the wedding is done, I should be back to blogging regularly (or at least semi-regularly :)
I want to do more detailed posts including tips on DIYing a wedding and working with flowers but for now I am just going to share some pictures taken by my hubby. Unfortunately, some aren’t the best since we were running around like crazy people and occasionally had to use the flash and auto settings (gasp!)
_MG_5645b_MG_5648


This is the groom grinning silly and two of the groomsmen. These also happens to be the only pictures I have of the boutonnieres. And no good pictures of the corsages :( hopefully I can get some from the photographers.

_MG_5602
Cute little buckets tied to the ends of the pews.
_MG_5558b_MG_5652bIMG_5611   I collected over 50 various glass containers for candles at the front of the chapel. It looked so pretty once they were all lit. _MG_5640  I had been planning on reselling them all but now I am kind of attached to my collection. It is silly really…now if only I can convince myself of that.
No good pictures of the bouquets yet either but here I am putting the finishing touches on the lace and heirloom handkerchief that wrapped the bride’s bouquet. You can see one of the bridesmaid’s bouquets behind me.
IMG_5618 
Here is the prayer tree at the reception waiting for people to write prayers and blessings for the couple on ribbon and tie them on. (Complete with crystals stolen borrowed from the chandelier in my dining room. Makes me giggle when I think about it.) _MG_5671 And here it is again after a few people had tied on their prayers (and all natural light was gone)
IMG_5721b
And lastly, here are the centerpieces:
IMG_5676 _MG_5681
Proofreading this post, I found myself thinking "Wow! It looks like a real wedding."  Umm...It was a real wedding. And better than just looking like one, I think the bride and groom and their families felt like it was too. Can't wait to get more pictures to share and get started on non-wedding projects. Until then, it is good to be back sharing these creative notions.

The Shabby Nest

Monday, April 4, 2011

Pin-Up Mondays

I am pretty much completely hooked on pinterest.com. It is a great site that lets you “pin” images to your “boards”. It is like visual bookmarking and it retains the link to the original location so you can always find that tutorial or give credit for that knock off. You can also follow friends and see what they are pinning or look at everything and see what other things have been pinned by anyone and everyone. It is an amazing site that I can get lost in for hours.

I want to start regularly sharing what I have recently pinned so I can share what catches my eye, what projects I want to do, cloths I want to buy, or recipes I want to make.

First up a skirt from my “Crafts I Want to Do” board:
I actually made one using this tutorial this weekend that I will share with you really soon.


I am needing to recover our dining room chairs and have my eye out for different patterns I like. This fabric from Joann’s in my “For the Home” board is an option:
Source: joann.com via Jenni on Pinterest


I have a board for pretty organization ideas. Isn’t this pallet paper shelving so clever?


And one item of pure silliness that I really want:
Nothing says spring better than fresh greens and bunny ears :)

If anyone else is on pinterest, let me know. I would love to follow you and see what you pin.

Monday, March 28, 2011

A Winner and Some Flowers

First things first. The winner for my first giveaway is:
Lucky #7:
random
winner


Congratulations Darcy! I will be emailing you shortly.
A very heartfelt thanks goes out to all of you lovely ladies for entering and to all my followers for following.
The second part is just a quick little post for you. I am doing the flowers for a friend’s wedding in May. You can see my centerpieces ideas here. I took a flower arranging class at The Connection Wholesale Florist & The Flower Market in Fort Worth, Texas last weekend to help me prepare. My hands were a little busy so I wasn’t able to take pictures and I don’t think it would be very helpful to do a tutorial without them so I will just share the results.
Here is the hand tied bouquet featuring green roses, wax flower for filler and a “collar” of bear grass and lemon leaf.
IMG_5096 
I learned how to add the tied and buttoned look which is actually super easy. You just twist and wrap it back and forth and then use corsage pins stuck in the stems.

IMG_5093
I had the chance to make a boutonniere as well. (I can never spell that word right without spell check). The dark base leaf is called lemon leaf or salal and the pink accents again are wax flower which actually comes in several colors.

IMG_5071

And a corsage.
 IMG_5086 IMG_5088

And finally an arrangement. Sadly it got thrown across my car when somebody decided they didn’t care if I was in that lane, they were going to join me. So it is a little kerflumpled.

IMG_5090

Did you know that Design Master Floral Spray Paint exists? I didn’t. It come in all the colors of the rainbow and really opens up possibilities. The instructor demonstrated with one of my roses which is how I got the blue one.
The class was really great. It was good to get some hands on experience with instruction and gave me just the refresher I need to be confident going into this wedding. If anyone in the Dallas / Fort Worth area is looking for a floral design class they can learn more about this one here.

Bonus! I just found out that Cassie from Primitive & Proper highlighted Mrs. T. from her Piece of Work Wednesday link party last week. Check out the 62 other great projects linked up here.  

Where this post is partying:

http://www.thethriftyhome.com

Thursday, March 24, 2011

The Adventures of Mrs. T…

Let me tell you about Mrs. T and the adventures we had together. This story will just be tutorial where I share my lessons learned rather than instructions how-to. Because really, what are the chances you will see a set of file boxes on Craigslist and want to turn them into an end table for a friend? Not very good. But there is a good chance that you may hit some of the same road bumps while repairing and refreshing your own Craigslist finds.
Mrs. T’s beginning where humble ones. She was a set of boxes intended to store scrapbook paper that her previous owner no longer loved and cast off to some stranger with $20. Here she is scared and alone the night I brought her home. Picture 002-1
She actually began as two separate pieces so I started her journey to find her true form by gluing her sides together. I smeared one side with Gorilla Wood Glue set the other side on top and weighed it down with wine bottles.
IMG_4426-1 IMG_4427
If you look closely you can tell I did this step shortly after I visited the Land of Two Buck Chuck…oh, Trader Joe’s, why won’t you come to Texas? You make me sad…

There were a few other steps where I glued major parts together and this is what I learned:
IMG_4606
Lesson #342-389:
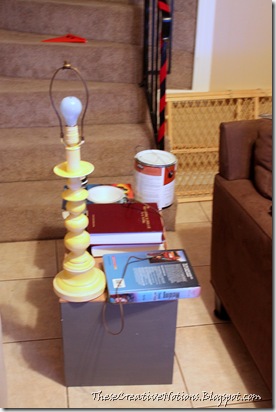
  • Careful what you use to weigh it down. Paint cans will inexplicable fall and pour paint everywhere. And you will be thanking the Lord for tile floors.
    • Bonus lesson: If you want to make your grout lines look cleaner, pour white paint everywhere and then wipe it back up.
  • Okay, the lamp probably wasn’t a good idea either. or the wine bottles from before. Use things that can fall and live.
  • Walk away. Just walk away. Do not plan on moving to the next step in 20 minutes even though the instructions say the glue should be set by then. The longer you let it sit the stronger the bond you will have. So just walk away…
  • If you are a nerd, using welding books will make you smile. I think it has something to do with using welding to join things together without welding. And seeing my academic pursuits aid my creative pursuits.

    This is the glue I used. And lesson learned? It works great.
    gorilla wood glue
    To paint, I used an oil based primer. I always use this primer when painting on a laminate or veneer surface. When using oil based paint, it is best to use a roller or brush that is disposable. In between coats, wrap it in plastic wrap and a Ziploc bag and then throw away when you are done! I just got this Purdy brush a little while ago. It works really great but I recommend only using it with latex paint simply for the cleaning up factor.
    IMG_4513

    All projects have an ugly stage. Lesson #401: Some projects have extremely long ugly stages. If I had to guess what puberty looked like for furniture, it would be this:
    image

    Lesson #452: Just because $3 for a leg and $2 for a base plate sounds inexpensive, doesn’t mean it will  be. When you multiply that by 4 it adds up. So worth it though. See those great legs that help Mrs. T look like a piece of furniture? You find them here. I simply screwed the base plate (found here) to the bottom of Mrs. T and then screw in the legs. And see how they have brass tips? Well a pizza box, Frog Tape, a plastic bag, and silver Krylon spray paint fixed that. 
    IMG_4578


    Lesson #647: Wood filler is wonderful.
    When I cut the board for the top, I did a less than perfect job. I am still pretty proud of my cutting skills considering I was using a circular saw and supporting the wood on a plastic trunk. I was able to make up for my loose interpretation of square by adding wood filler to the corner. The trick with wood filler is to over fill and then sand smooth. Works like a charm. When I got done painting, you couldn’t tell I had so badly goofed.
    IMG_4606
    One side of Mrs. T was designed with slits to allow for the hook part of hanging files but since that was no longer her job, I filled them with wood filler.
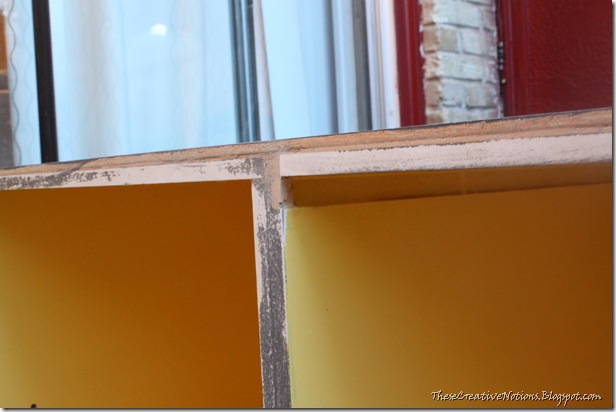
    IMG_4623 IMG_4611 It took several round of filling, drying, and sanding but when I got done it was solid and smooth. You can also see where I used the wood filler to fill any gaps between my top/bottom board and Mrs. T’s original boxing.
    I choose to dress up Mrs. T by Mod Podging on some great paper and quickly learned that matching the pattern is a bear but painting under the areas where your seam will be with a camouflaging color helps keep things looking nice and neat. My Purdy paint brush made it possible to paint my camouflaging color with minimal touching up.
    IMG_4749
    Lesson learned #953: There will be less touch ups to do if you don’t try to take a picture of yourself using your Purdy brush.


    Lesson learned # 1013: If you aren’t cool enough to own those cool bench cookies from Rockler, spray paint cans can be a substitute for light weight items. Worked well while I was Mod Podging.
    IMG_4752
    To finish and protect Mrs. T, I used a combination of Wipe-On Poly and Finishing Wax.
    IMG_4767 IMG_5105-1
    I wanted the harder finish that the Wipe-On Poly gives so I put several coats of that on all surfaces and then used the Finishing Wax on the top to give Mrs. T that real furniture feel. I am having troubles with lint and the finishing wax. Does anyone have any lessons they have learned to share?

    As a recap, here is most of the products I used.
    image
    If I could do it all over again the #1 thing I would change would be to do all of the constructing first and then paint. With snow days and multiple redundant trips to the store, I was trying to do what I could when I could but I think that really added to my frustrations.


    After following along on our journey, you may be wondering why did I name her Mrs. T? Well because she pities the fool that doesn’t learn lessons from their mistakes and the mistakes of others. Lessons learned, Mrs. T… Lessons Learned.
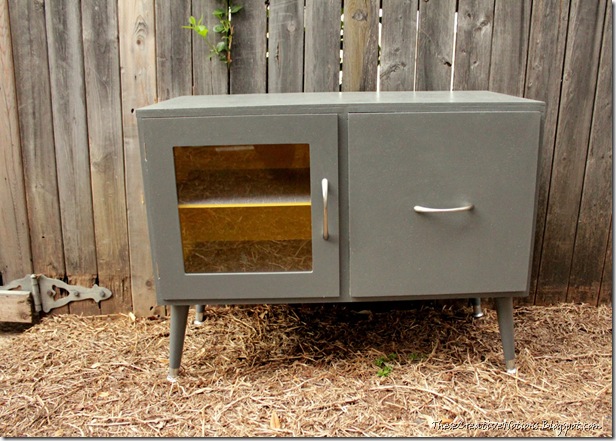
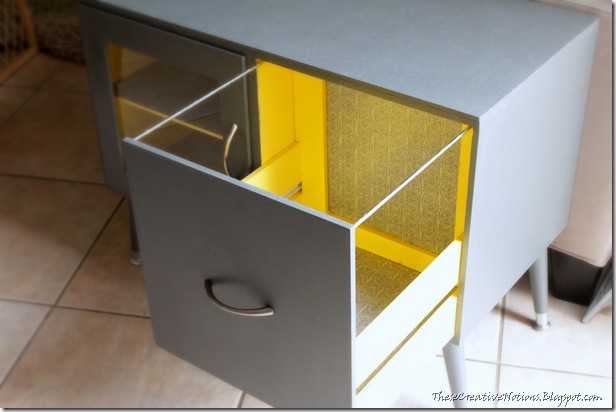
    IMG_4855
    IMG_4845
    And because I have to have one gratuitous pup pic, here is Desmond waxing philosophical over Mrs. T.
    IMG_4858
    And here she is in her new home!
    _MG_4979
    _MG_4995 
    Mrs. T will be attending the following parties:
    DIY Club
    Furniture Feature Fridays